
How to Master Wig Styling: A Step-by-Step Guide
The freedom to switch up your look is one of the best parts of owning a human hair wig. Go from sleek and straight to bouncy curls whenever the mood strikes. But achieving that salon-perfect finish that actually lasts all day requires the right approach. That's where great wig styling comes in. It’s the secret to creating endless looks without damaging your hair. This guide will show you exactly how to use heat tools, section your hair like a pro, and lock in your style for a flawless, all-day hold. You'll have the confidence to experiment and have fun with your look.
Key Takeaways
- A great style starts with a clean wig: Always work with a wig that is completely clean, dry, and detangled. This simple prep routine protects the hair fibers from damage and ensures your final look is smooth and polished.
- Know your wig's heat limits: Human hair wigs offer styling freedom with heat tools, but you must use a heat protectant spray. Most synthetic wigs can be permanently damaged by heat, so always confirm yours is heat-friendly before using hot tools.
- Secure your wig for styling and storage: Using a mannequin head provides a stable base for curling or straightening. Storing your styled wig on a stand is just as important, as it preserves the shape and prevents tangles between wears.
Your Essential Wig Styling Toolkit
Before you start styling, it’s important to have the right equipment on hand. Think of it as setting up your artist’s station. Having everything you need within reach makes the process smoother, more enjoyable, and gives you a much better result. When you invest in a beautiful wig, using the proper tools ensures it stays looking its best for years to come. Let’s walk through exactly what you’ll need to create any style you can imagine.
Your Go-To Styling Tools
Your styling kit doesn’t need to be complicated, but a few key items are non-negotiable. First, a wig head is essential. Whether you choose a simple foam head or a tripod stand, it provides a stable base so you can work with both hands. You’ll also want a good set of tools to shape and hold your style, including a teasing comb for volume, hairspray for hold, shearing scissors for trims, and plenty of clips to section the hair as you work. These basics form the foundation for styling all types of human hair medical wigs and will help you achieve a professional-looking finish every time.
Alternative Brushes for Detangling
When it comes to detangling, your everyday hairbrush might do more harm than good. Brushes with ball-tips can easily snag the delicate knots at the base of your wig, causing shedding and damage over time. Protecting your wig means using tools that are gentle on both the hair fibers and the cap construction. Think of it this way: you wouldn't use a harsh scrub on a silk blouse, and the same gentle approach applies here. The right tools will glide through tangles without pulling, keeping your wig smooth and extending its lifespan. Here are a few alternatives that are much safer for your investment.
A wide-tooth comb is the gold standard for wig care and should be your first line of defense against tangles. Its design allows it to gently separate strands without the friction that causes breakage and frizz. Always start combing from the ends of the hair and slowly work your way up to the roots to avoid creating a bigger knot. For curly or wavy wigs, you might find that your fingertips are the best tool. Gently separating curls by hand helps maintain the curl pattern and prevents the frizz that a brush or comb can create. For a surprising but effective option, some wig stylists swear by a simple cat brush with fine, flexible metal teeth. It’s incredibly gentle and works wonders on stubborn tangles without yanking the hair.
Choosing Wig-Safe Styling Products
When it comes to styling products, always choose formulas made specifically for wigs. Your natural hair produces oils that help break down products, but a wig doesn’t. Using regular shampoos, conditioners, or sprays can lead to sticky buildup that’s difficult to remove and can damage the hair fibers over time. Look for wig-safe hairspray and heat protectants. For longer styles that are prone to tangling, a detangling spray can be a lifesaver. It helps smooth the hair and makes combing much gentler, which is key to preserving the life of your wig. You can find more care tips in our frequently asked questions.
Using Detangling Sprays
When it comes to maintaining the beauty and longevity of your wig, a detangling spray is a must-have. A quality spray helps smooth the hair and makes combing much gentler, which is crucial for preserving the delicate fibers of your wig. As noted in a guide on styling human hair wigs, certain products can significantly reduce tangles, especially on longer styles. This simple step not only makes maintenance easier but also protects the hair from the kind of friction and pulling that can cause damage over time, ensuring your wig remains beautiful and ready to wear.
Accessorizing Your Look
Accessories are a fantastic way to personalize your style and make your wig look even more natural. According to Simply Wigs, items like headbands, scarves, and clips can add a unique touch while also helping to keep your wig secure. Beyond wearable accessories, the tools you use for storage are just as important for maintaining your look. Using a mannequin head provides a stable base for styling, and storing your wig on a stand between wears helps preserve its shape and prevents tangles. This attention to detail is a key part of proper medical wig care and ensures your style stays flawless.
Creating Your Perfect Styling Space
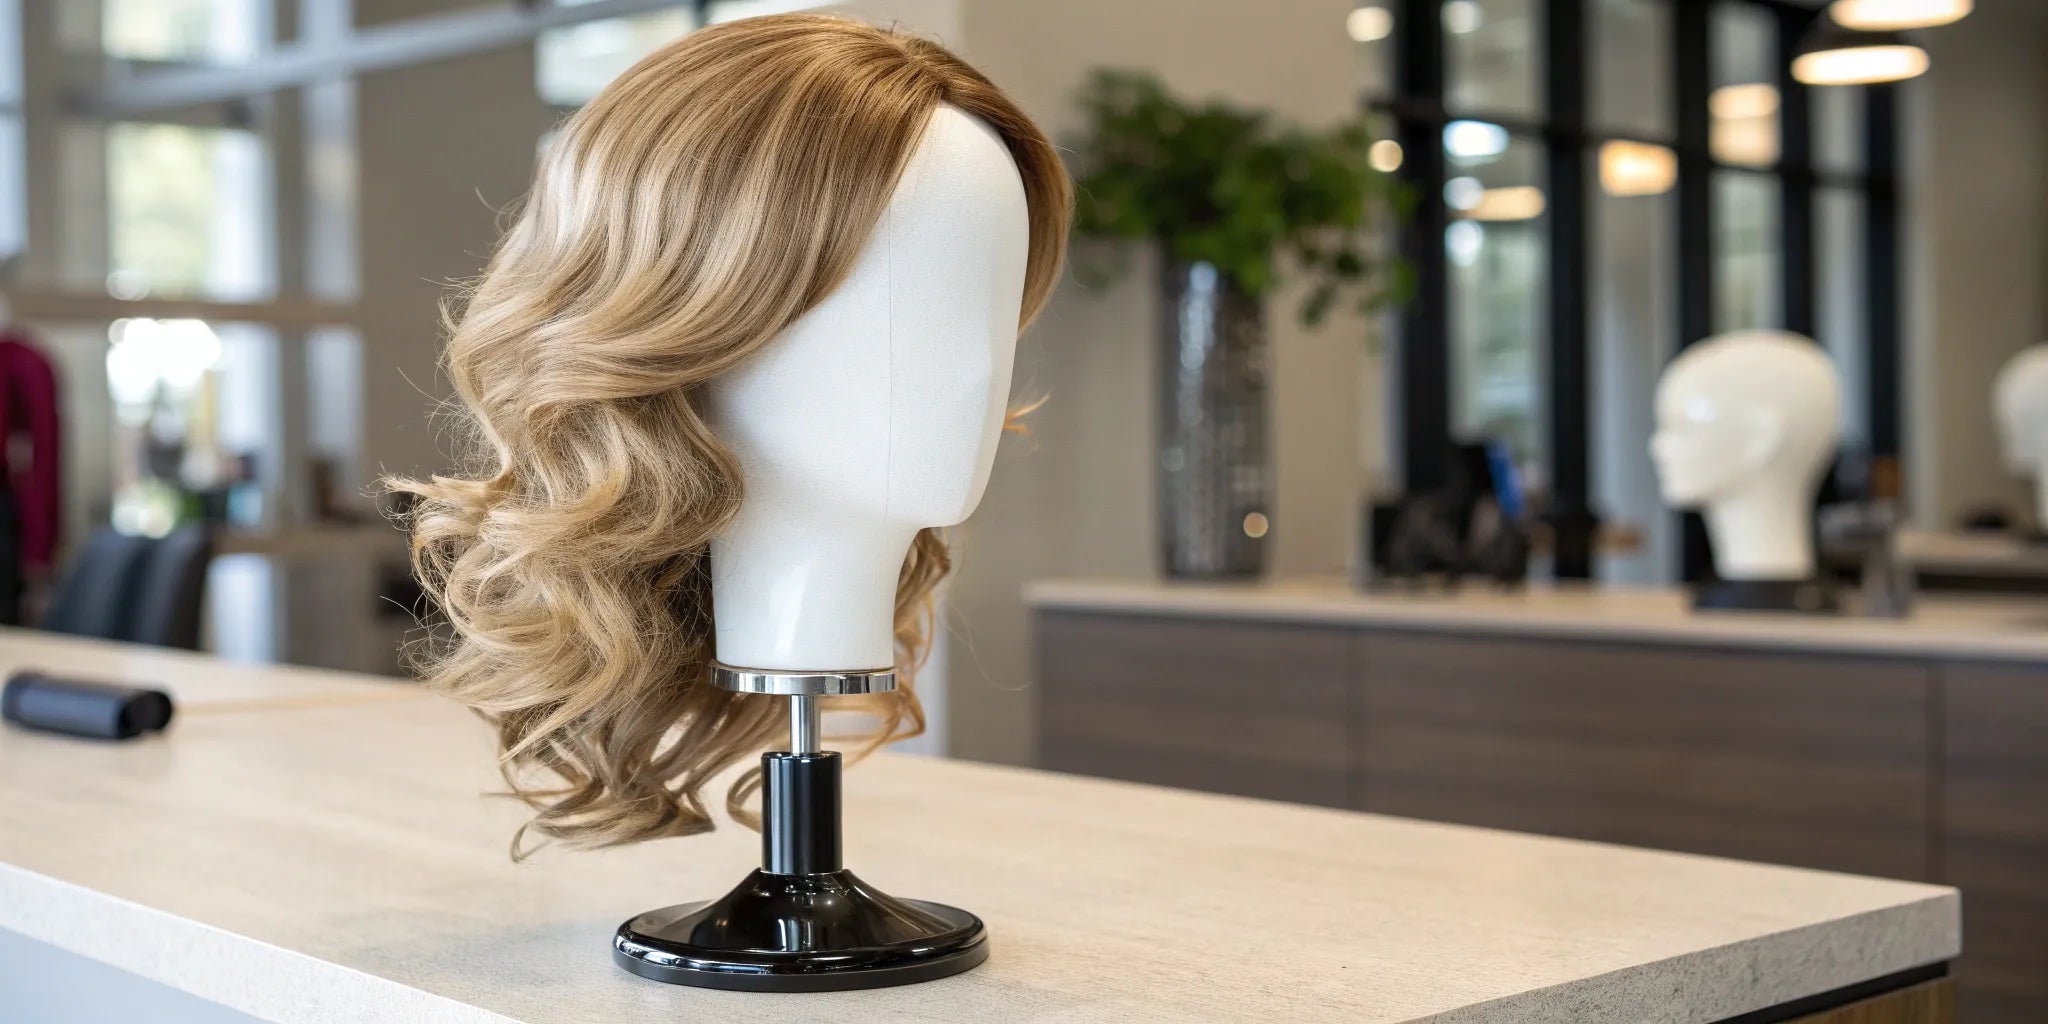
Once you have your tools, it’s time to get your wig ready. Always handle your wig gently by picking it up by the ear tabs to avoid stretching the cap. Place the wig onto your mannequin head by positioning the front at the mannequin’s forehead, then gently pulling the back down into place. To keep it from slipping while you work, secure it with two T-pins. Insert the pins through the thicker, fabric part of the wig cap near the sides, just above the ears. This creates a secure hold that won’t damage the delicate lace or monofilament top. If you'd like a hands-on demonstration, we can show you during a private consultation.
Getting Your Wig Ready for Styling
A great hairstyle starts long before you pick up a curling iron. Think of it as creating the perfect canvas for your art. Prepping your wig properly ensures that your final look is smooth, polished, and lasts all day. A clean, dry, and tangle-free wig is much easier to work with and gives you the best results, whether you’re aiming for sleek and straight or bouncy curls. Taking these few extra steps not only makes styling simpler but also protects your investment, keeping your wig looking beautiful for every wear.
The Gentle Way to Wash Your Wig
It’s always a good idea to wash your wig a day or two before you plan to style and wear it, especially for a special occasion. This gives you plenty of time to let it dry completely without rushing. When you’re ready, fill a basin with lukewarm water and a small amount of wig-safe shampoo. Gently submerge your wig and swish it around; avoid any harsh rubbing or twisting, which can cause tangles. Drain the soapy water, refill with clean water, and rinse thoroughly. Repeat the process with conditioner, making sure every strand of your beautiful human hair wig gets the care it deserves.
A Note on Cleaning Synthetic Wigs
While the steps for washing a human hair wig are straightforward, synthetic wigs require a slightly different approach. Since synthetic fibers are a type of plastic, they don't absorb products the same way human hair does. You don’t necessarily need expensive, specialized shampoos; a gentle, clarifying soap is often very effective at removing buildup without damaging the fibers. The washing technique, however, remains the same: use lukewarm water and gently swish the wig to clean it. Avoid any harsh scrubbing, as this can lead to tangles and frizz. The key is to be gentle and use products that won't leave a sticky residue. For more answers to common wig care questions, our FAQ page is a great resource.
Safely Drying Your Wig
Patience is key when it comes to drying your wig. The best and safest method is to let it air dry completely on a wig stand. This helps maintain its shape and protects the delicate fibers from heat damage. After washing, gently blot the excess water with a towel (don't wring it out!) and place it on the stand away from direct sunlight. If you're in a pinch, you can use a hairdryer on a low, cool setting. Just be sure not to get too close to the hair or cap. For more personalized care tips, you can always ask for advice during a free consultation.
The Final Prep: Detangle and Inspect
Once your wig is completely dry, it’s time to get it smooth and ready for styling. Always use a wide-tooth comb or a paddle brush specifically designed for wigs, as regular brushes can be too harsh and cause breakage. Start brushing from the ends of the hair and slowly work your way up to the roots to gently remove any knots without pulling. Before placing it on a mannequin head, do a quick check to make sure no hair is caught underneath the wig cap. This simple step ensures a smooth foundation for styling and helps you avoid snags later on.
Heat Styling Your Wig Like a Pro
This is where the real fun begins. One of the best parts of owning a human hair wig is the freedom to change up your look with heat styling, just like you would with your own hair. Whether you’re dreaming of sleek, straight locks for a professional setting or bouncy curls for a night out, you can achieve it all with the right tools and techniques. It’s all about working smart to protect the hair and create a style that feels completely you. Before you plug in your flat iron or curling wand, let’s walk through the steps to safely and effectively style your wig. Remember, these tips are for human hair wigs, as most synthetic wigs can't handle the heat. With a little practice, you'll be styling your wig like a pro, creating looks that are both beautiful and long-lasting.
How Much Heat Is Too Much?
First things first: let's talk heat. The golden rule of styling a human hair wig is to always start with a heat protectant. A light mist of a quality heat protectant spray creates a barrier that shields the hair from damage, keeping it soft and healthy. When you’re ready to style, begin with the lowest heat setting on your tool and gradually increase it if needed. Human hair wigs don't require scorching hot temperatures to hold a style. It’s always better to do a second pass with the iron on a lower setting than to risk damaging the hair with too much heat at once. This simple step makes a huge difference in preserving the life and beauty of your wig.
Heat Limits for Synthetic Wigs
While human hair wigs offer incredible styling freedom, it’s a different story with most synthetic options. It's crucial to avoid using hot tools on a standard synthetic wig because the fibers are essentially a type of plastic that can melt, frizz, or become permanently damaged when exposed to high temperatures. Unlike human hair, which can be safely styled with the right precautions, a synthetic wig can be ruined in seconds by a curling iron or flat iron. This is why it's so important to remember that most synthetic wigs can be permanently damaged by heat, so you should always confirm yours is heat-friendly before reaching for any hot tools. Some synthetic wigs are specifically designed to be "heat-resistant," but even these have a much lower temperature limit than human hair. Always check the manufacturer's instructions to be certain.
Creating Soft, Natural-Looking Curls
Ready for some gorgeous curls? The key is choosing the right barrel size for your curling iron. A smaller barrel, around a half-inch, will give you tighter, beachy waves, while a larger one creates big, bouncy curls. Start by taking a small section of hair, about one to two inches wide. Place the curling iron near the root and gently wrap the hair around it, moving down toward the ends. For a classic, bouncy curl, release the hair from the iron after a few seconds. If you prefer a more relaxed, drawn-out wave, you can gently pull on the end of the curl as it cools. Work your way around your wig in sections for a consistent, beautiful result.
Curling Methods for Human Hair Wigs
When it comes to curling your human hair wig, the right technique can make all the difference. The secret to achieving soft, natural-looking curls often comes down to the barrel size of your curling iron. Think of it this way: a smaller barrel, around a half-inch, is your go-to for creating tighter, beachy waves, while a larger barrel will give you those big, glamorous curls. This versatility is one of the best things about investing in a quality human hair wig, as it allows you to completely customize your look to match your mood or the occasion. You're not stuck with one style; you have the freedom to play and find what makes you feel most confident.
How to Get Effortless Beachy Waves
To create those perfect, effortless beachy waves, start by taking a small section of hair, about one to two inches wide. Place your curling iron near the root and gently wrap the hair around the barrel, moving down toward the ends. Hold it for just a few seconds before releasing. Here’s a pro tip: for a more relaxed, drawn-out wave, gently pull on the end of the curl as it cools. This softens the shape and gives it that natural, lived-in look. Working in small, consistent sections around the entire wig will help you achieve a beautiful, cohesive style. It’s a simple technique that works wonderfully on all types of human hair wigs, from lace front to monofilament top styles.
Getting a Silky, Straight Finish
For a sleek, polished look, a flat iron is your best friend. After applying your heat protectant, section the hair and work with small, manageable pieces. For a super straight, modern style, clamp the flat iron near the roots and pull it straight down to the ends in one smooth motion. If you want to maintain some natural-looking body and movement, simply curve your wrist inward as you glide the iron down the hair shaft. The more you curve your hand, the more bend and volume you’ll create at the ends. This technique prevents the hair from looking too flat and gives it a soft, natural finish.
Adding Volume and Body for a Fuller Look
If your style is looking a little flat, adding volume is an easy fix. The best way to get some lift at the roots is by gently teasing the hair. Take a small section of hair at the crown, hold it straight up, and use a wig comb to gently push the hair down toward the base. This creates a small cushion of hair at the root that adds instant height. Be gentle to avoid creating knots. Once you’ve got the volume you want, a light spritz of a wig-safe hairspray will help hold the style in place all day without making it stiff or sticky. It’s the perfect finishing touch for any look.
Using a Crimper for Root Volume
For even more lift that lasts all day, a crimper can be your secret weapon. If you're looking for serious height that won't fall flat after a few hours, this is the technique stylists use to create incredible, long-lasting body. Using a micro-crimper on the roots creates a textured foundation that props up the top layers of hair, giving you amazing volume without having to constantly tease or re-fluff your style. This is especially effective for adding lift at the crown or in any area where you want a fuller appearance. The best part is that the crimped sections remain completely hidden under a smooth top layer of hair, so all anyone will see is a gorgeous, full-bodied style that looks effortlessly natural.
To get started, it’s essential to prepare your wig properly. A great style always begins with a clean, dry, and detangled wig, as this protects the hair fibers and ensures you get the smoothest possible results. Once your wig is prepped, section off the top layer of hair that you want to remain smooth and clip it out of the way. Working with the under-layers, take a small one-inch section and hold it straight up from the cap. Take your crimper and gently press down on just the first inch or two of hair closest to the root. After a few seconds, release and move to the next section. Once you’ve crimped all the root sections where you want volume, unclip the top layer and let it fall over your work. Gently brush it into place, and finish with a light mist of wig-safe hairspray to lock in your style.
Keeping Your Wig in Place While You Style
Before you pick up a comb or a curling iron, the most important step is making sure your wig is stable. A wig that shifts and slides around is nearly impossible to style well. Getting a secure base not only makes the process easier but also protects your investment and ensures the final look is exactly what you envisioned. These simple steps will help you create a solid foundation for any style you want to create.
Caps, Grips, or Glue? Finding Your Best Fit
A secure style starts with a secure fit. If your wig feels loose, it will be difficult to manage, so finding the right accessories is key. A wig grip can be a game-changer here. I recommend looking for a velvety wig grip with a velcro closure, as they’re comfortable and provide excellent hold without being too tight. While silicone grips are an option, many people find them bumpy, sticky, and itchy against the scalp. The goal is to find a solution that keeps your wig in place without causing irritation. If you're unsure about the best fit, a professional consultation can help you find the perfect, most comfortable option for your needs.
Using a WigGrip for Extra Security
A WigGrip is one of the simplest and most effective tools for ensuring your wig stays put, whether you're styling it on your head or wearing it out. It’s a soft, adjustable headband, usually made of a velvety material, that creates a non-slip base for your wig to hold onto. To put it on, wrap the band around your hairline, positioning it just behind your ears. Secure the velcro closure at the nape of your neck, adjusting it until it feels snug but not tight. The goal is a secure fit that doesn't cause any pressure or discomfort. This creates the perfect stable foundation, allowing you to style with confidence.
With the WigGrip in position, you can place your wig directly on top. Line up the front of the wig with the front edge of the grip, then gently pull the back of the wig down. The velvety fabric will naturally cling to the inside of the wig cap, preventing it from sliding around. This method is a fantastic alternative to adhesives, as it’s gentle on your skin and protects your natural hairline from friction, which is especially important for those with sensitive scalps. It also makes taking your wig on and off incredibly simple. For more advice on keeping your wig in place, a consistent care routine is key. A grip gives you the peace of mind to focus on perfecting your look without worrying about slips or adjustments.
Should You Style On or Off a Mannequin Head?
This is a classic question, and the answer is: it depends on what you’re doing. For tasks like washing, drying, or heat styling with a curling iron, a mannequin head is your best friend. It gives you a stable, 360-degree view and keeps your hands free, which is especially helpful for styling the back. However, when it comes to cutting, trimming bangs, or doing final touch-ups, it’s often better to style the wig while you’re wearing it. This allows you to see exactly how the hair frames your face and falls around your shoulders, ensuring the style complements your features perfectly. You get a real-time preview of the final look.
My Top Tips for a Secure, Comfy Fit
A few simple habits can make a huge difference in how securely your wig sits. When you pick up your wig, always try to hold it by the ear tabs. This little trick helps you place it correctly on your head or a mannequin every time. To check if it’s secure enough for styling, do a gentle head shake. If it doesn’t budge, you’re good to go. Most importantly, always make sure your wig is completely dry before you begin styling. Styling human hair medical wigs when they are wet can cause the fibers to stretch and can damage the cap’s shape over time. Patience is key here; let it air dry completely for the best results.
The "Four-Finger Rule" for Perfect Placement
Getting your wig to look like it’s naturally yours starts with perfect placement. A simple trick I always recommend is the "Four-Finger Rule." It’s a foolproof way to find your natural hairline and avoid placing the wig too far forward or too far back. To do it, just place four fingers flat against your forehead with your pinky finger resting on top of your eyebrow. The spot where your index finger lands is the perfect place for the front edge of your wig to sit. This simple measurement mimics a natural hairline and is the first step to a look that feels completely seamless.
Once you’ve found the right spot, you can focus on securing it for the day. A well-placed wig is much easier to secure, whether you’re using the built-in combs or a wig grip for extra hold. Before you start styling, give your head a gentle shake to make sure everything feels snug and doesn't shift. This quick check gives you the confidence that your wig will stay put, allowing you to style it without worry. Proper placement is a key part of overall wig care because it prevents the lace front from being over-stretched or damaged, helping protect your investment.
Making Your Wig Look Undetectable
A great wig is a fantastic starting point, but the real magic happens when you add your own personal touches. Customizing your wig is what makes it feel less like something you’re wearing and more like your own hair. Think of it like tailoring a favorite outfit; a few small adjustments can make all the difference in how it looks and feels. Simple tweaks, from trimming the bangs to blending the hairline, help you achieve a look so seamless that it feels completely natural. These steps will help you confidently style your wig so it perfectly reflects you.
Trimming and Parting Your Wig for a Custom Fit
Getting the cut just right is one of the best ways to make a wig your own. While our wigs arrive beautifully styled, a few snips can help frame your face perfectly. If you decide to trim your wig, always make sure it’s completely dry first. Styling or cutting a wig while it's wet can damage the fibers and ruin the shape. For the most accurate results, wear the wig while you trim it so you can see exactly how the layers will fall. For bigger changes, we recommend visiting a stylist who has experience with wigs. They can add layers or thin out any bulk to create a style that truly complements you.
When to Cut Your Wig
The most important thing to remember is to only cut your wig when it is completely dry. Human hair has a tendency to stretch when wet, so if you trim it before it’s dry, you might end up with a much shorter and uneven style than you intended once it settles. It’s also a good idea to make any cuts before you do any heat styling. This allows you to see the hair in its natural state, giving you a clear idea of its length and texture before you begin shaping it. This simple rule is the key to avoiding any cutting mishaps and ensuring your trim is precise.
How to Cut for a Natural Look
For the best results, put the wig on before you start trimming. This lets you see exactly how the hair frames your face and where the layers should fall to best complement your features. When you’re ready to cut, use sharp shearing scissors and make small, vertical snips into the ends rather than a blunt, horizontal cut. This technique, often called point cutting, helps soften the edges and creates a more natural, blended look. Taking your time and cutting a little bit at a time is always the safest approach, especially when working with high-quality human hair medical wigs that you want to last.
The Secret to a Seamless Hairline
A natural-looking hairline is the secret to a flawless finish. You want to erase any obvious lines where the wig begins. When putting on your wig, hold it by the ear tabs, place the front on your forehead, and gently slide it back until it meets your natural hairline. Our lace front wigs are designed specifically for this, as the delicate lace base creates the illusion of hair growing right from your scalp. For an even better blend, you can dab a small amount of powder foundation along the part and hairline of the wig to match it perfectly to your skin tone.
Advanced Hairline Customization Techniques
If you're comfortable with a bit more customization, you can take your hairline to the next level. Many wig wearers carefully pluck a few hairs from the hairline using tweezers to create a softer, less uniform edge that mimics natural hair growth. This is especially effective on our lace front wigs, as it breaks up the density for an incredibly realistic look. Another pro tip is to trim any excess lace right up to the hairline before your first wear. For the final touch, you can even style a few wispy baby hairs around the forehead. These advanced techniques require a steady hand, but they make a world of difference in achieving a truly undetectable finish.
How to Give Your Wig Realistic Movement
Real hair has life and movement, and your wig should too. To avoid a look that’s too flat or perfect, focus on adding a bit of texture and volume. You can create some lift at the crown by gently teasing the roots with a wide-tooth comb and setting it with a light mist of wig-safe hairspray. To give the ends a healthy shine and tame flyaways, warm up a single pump of hair serum or oil in your hands. Then, lightly smooth it through the bottom half of the hair. This simple trick adds a beautiful, healthy-looking sheen and helps the hair move naturally as you go about your day.
Are You Making These Wig Styling Mistakes?
Styling your wig is your chance to make it truly feel like your own. But a few common missteps can accidentally shorten its lifespan or leave it looking less than its best. The good news is that these mistakes are easy to avoid once you know what to look out for. Taking a little extra care with your tools, timing, and technique will keep your wig looking beautiful and natural for years to come. Let’s walk through the most common styling mistakes and how you can sidestep them for flawless results every time.
The Danger of Wrong Tools and High Heat
One of the quickest ways to damage a wig is by using the wrong tools or applying too much heat. It’s essential to remember that not all wigs are created equal. Most synthetic wigs cannot handle heat at all; tools like curling irons or straighteners can melt the delicate fibers. If you have a synthetic wig, be sure it’s labeled "heat-resistant" before you even think about plugging in a hot tool.
For human hair medical wigs, you have more flexibility. You can use heat tools, but always apply a heat-protecting spray first to shield the hair from damage. Also, start with the lowest heat setting and work your way up only if necessary. Using brushes and combs designed for regular hair can also be too harsh, causing breakage and frizz. Stick to tools made specifically for wigs.
Why Styling a Wet Wig Is a Big No-No
It might seem logical to style your wig while it’s damp, just like you would with your own hair, but this is a major mistake. Wig fibers are most vulnerable when they’re wet. Brushing, combing, or heat styling a wet wig can stretch the fibers, damage the cap, and ruin its shape permanently. Always wait until your wig is completely dry before you begin styling.
Another common myth is that you can skip washing and styling. Neglecting to clean your wig regularly can cause it to become dry, dirty, and tangled. This not only looks unappealing but also leads to more hair shedding when you eventually brush it. Establishing a consistent washing and conditioning routine is key to keeping your wig healthy and easy to style. If you have questions about caring for your specific wig, our FAQs page is a great resource.
The Right Way to Brush and Comb Your Wig
How you brush your wig matters just as much as when you brush it. Using the right technique prevents tangles and shedding. For all wig types, it’s best to start by gently detangling the ends with your fingers. Then, using a wide-tooth comb or a wig-safe brush, work your way up from the ends to the roots in small sections. This gentle approach prevents you from pulling on the delicate knots at the base of the wig.
The technique also varies by wig type. For wavy or curly synthetic wigs, it’s best to avoid brushes and combs altogether. Instead, gently shake out the wig after washing and use your fingertips to define the curls. For human hair wigs, the "ends-to-roots" brushing method is perfect for keeping the hair smooth and tangle-free.
Styling Different Wig Types: What You Need to Know
Once you’ve found the perfect wig, the next step is making it your own. Styling is what transforms a beautiful hairpiece into a look that feels completely natural and personal. But before you reach for your curling iron, it’s important to understand that not all wigs are created equal. The material of your wig, whether it’s human hair or synthetic, dictates the tools, products, and techniques you can use. Getting this right is the key to creating gorgeous styles while protecting your investment for the long haul.
Think of it like caring for different types of fabric; you wouldn’t use the same methods on silk as you would on denim. The same principle applies here. Human hair offers incredible versatility, while synthetic fibers require a more specific approach. Learning the fundamentals for your wig type will give you the confidence to experiment with different looks, from sleek and straight to bouncy curls. We’ll walk through the key differences and share some pro tips to help you section your wig and lock in your style, ensuring you look and feel fantastic all day long.
Human Hair vs. Synthetic Wigs: Key Styling Differences
The biggest difference between styling human hair and synthetic wigs comes down to one word: heat. Our human hair medical wigs offer incredible styling flexibility because you can use heat tools like curling irons and straighteners just as you would on your own hair. This allows you to change your look whenever you feel like it.
Synthetic wigs, on the other hand, require more caution. Most synthetic fibers can melt or get damaged by high heat, so you should never use standard heat tools on them unless the label specifically says it's "heat-resistant" or "heat-friendly." For standard synthetic wigs, you’ll rely on foam rollers, wig-safe styling products, and steam to create curls and waves without causing irreversible damage. Always check the manufacturer's instructions first.
Understanding Human Hair Quality
When you choose a high-quality human hair wig, you’re not just getting beautiful hair; you’re getting the freedom to be creative. Human hair wigs can be styled in many ways, just like your own hair, which is what makes them such a wonderful investment. The quality of the hair directly impacts how well it holds a curl, how smoothly it straightens, and how long it maintains its luster. Learning a few simple styling tips not only makes the process easier but also helps your wig look incredibly natural and last for years. It’s about having the confidence to use heat tools and products to create a look that is uniquely you, day after day.
The Difference in Hair Types
Even within the world of human hair wigs, the original texture of the hair plays a role in styling. A wig made from naturally straight hair, for example, will be fantastic for achieving a sleek, polished look but may require a bit more effort to hold a tight curl all day. On the other hand, a wig with a natural wave or body will provide a great foundation for bouncy curls and voluminous styles. Understanding the base texture of your wig helps you work with its natural tendencies rather than against them, leading to styles that last longer and look more effortless. It’s a small detail that makes a big difference in your daily styling routine.
Tips for Styling Synthetic Wigs
Styling a synthetic wig requires a different approach, but you can still achieve beautiful results. The most important rule is to know whether your wig is heat-friendly. Most synthetic wigs cannot handle heat at all; common tools like curling irons or straighteners can permanently melt the delicate fibers, causing irreversible damage. If your wig is not labeled "heat-resistant," you’ll need to use heat-free methods like foam rollers or pin curls to create new shapes. For heat-friendly synthetic wigs, you can use hot tools, but you must use them on a very low setting and with specific techniques to avoid damage. It’s all about understanding the material you’re working with.
The "Heat and Cool" Method
For heat-friendly synthetic wigs, the "heat and cool" method is your key to success. Unlike human hair, synthetic fibers need to cool down completely in the desired shape to lock in the style. Wigs need heat to change their shape, but to keep that new shape, they must cool down while held in the position you want. For example, to create a curl, wrap a section of hair around your curling iron on a low setting for a few seconds. Then, carefully slide the curl off the barrel into your hand, clip it in place against the wig head, and let it cool completely. Once it’s no longer warm to the touch, you can unpin it to reveal a perfect, lasting curl.
Using a Steamer to Shape Fibers
A clothes steamer is a surprisingly effective and gentle tool for styling synthetic wigs. The moist heat from a steamer is less harsh than the dry heat from a curling iron, making it a safer option for smoothing frizz, taming flyaways, or adding soft waves. A clothes steamer is very helpful for shaping wigs and helping the fibers hold their new style. You can use it to redirect a stubborn part, smooth out kinks from storage, or even help set curls. Just be sure to hold the steamer several inches away from the wig to avoid oversaturating the fibers and always keep your hands clear of the hot steam.
How to Handle Curly Synthetic Wigs
When it comes to pre-curled or wavy synthetic wigs, less is definitely more. The goal is to preserve the beautiful curl pattern that the wig was designed with. For wavy or curly synthetic wigs, it’s best to avoid brushes and combs altogether, as they can separate the curl clumps and create a frizzy, tangled mess. Instead, gently shake out the wig after washing and use your fingertips to define and arrange the curls. If you need to detangle, do so very gently with your fingers or a wide-tooth comb while the wig is wet and conditioned. A light spritz of water is often all you need to refresh the curls between washes.
Styling Advice for Medical Hair Loss
When you’re experiencing medical hair loss, comfort is just as important as style. Your scalp may be more sensitive, so choosing a wig that feels good all day is essential. Many people find that lighter synthetic wigs are a great option, especially during treatment, as they are breathable and require less maintenance. Wearing a soft cotton or bamboo wig liner can also make a huge difference by creating a gentle barrier that absorbs moisture and prevents irritation. The right choice is deeply personal, which is why we offer private consultations to help you find a solution that not only looks beautiful but also feels comfortable and secure.
Choosing a Wig for Chemotherapy
During chemotherapy, your energy levels can fluctuate, and a low-maintenance routine can be a huge relief. This is why it’s often recommended to consider lighter synthetic wigs that are easier to wear and maintain. They often come pre-styled, so you can simply put them on and go without worrying about heat styling or complicated upkeep. While a synthetic wig can be a practical and beautiful choice during treatment, many of our clients choose one of our human hair medical wigs for long-term wear once they feel ready. It’s a wonderful way to regain a sense of normalcy and enjoy complete styling freedom again.
How to Section Your Wig for Easier Styling
A great style starts with great prep. Before you begin, make sure your wig is completely dry. Styling a wet wig is a common mistake that can cause the fibers to stretch and lose their shape over time. Once it’s dry, gently brush through it with a wide-tooth comb or a paddle brush to remove any tangles. This creates a smooth canvas to work with.
Next, section the hair using clips, just like a professional stylist would. Working with smaller, more manageable sections gives you better control, whether you’re curling, straightening, or creating an updo. This method ensures every strand gets the attention it needs, resulting in a more polished and even finish. If you ever need personalized tips, you can always book a consultation with a specialist.
Lock It In: Make Your Style Last All Day
After you’ve perfected your look, you want it to stay put. The key is using the right finishing products. A light mist of a strong-hold hairspray designed for wigs will lock in your style without making it stiff or sticky. Many people find success with products like Got2b Glued Blasting Freeze Spray for its impressive hold.
It’s crucial to use products made specifically for wigs because regular hair products can contain alcohols and other ingredients that dry out the fibers and cause damage. Using wig-safe sprays and serums will not only maintain your style but also help protect the hair, keeping your wig looking beautiful for much longer. For more care tips, our FAQ page is a great resource.
Advanced Styling and Customization
Once you've mastered the basics of washing, drying, and simple heat styling, you can start exploring more advanced techniques. This is where you get to be truly creative and make your wig a perfect reflection of your personal style. Customization is about more than just daily wear; it’s about transforming your wig into a piece that feels uniquely yours. From trying out intricate updos and braids to making more permanent changes like adding color or volume, these advanced steps allow you to tailor every detail. Think of your wig as a canvas, and these techniques are the tools you need to create a masterpiece that boosts your confidence and lets your personality shine through.
Planning Your Style Before You Start
A beautiful, complex hairstyle doesn’t happen by accident. Just like any creative project, the best results come from thoughtful preparation. Before you even touch a styling tool, taking the time to plan your look and set up your workspace properly will make the entire process smoother and more successful. This initial step ensures you have a clear vision and a stable foundation, which is essential for achieving a polished, professional-looking finish, especially when you’re trying a new or more detailed style.
Visualizing Your Final Look
A great style starts with great prep. Before you begin, find some inspiration photos of the hairstyle you want to create. Having a clear visual guide helps you break down the look into manageable steps. Think about where you’ll need to create volume, where the part should be, and how you’ll secure everything in place. Make sure your wig is completely dry before you start, as styling a wet wig is a common mistake that can cause the hair fibers to stretch and lose their shape over time. This planning phase is your roadmap to a flawless result.
Marking Your Wig Head for Precision
Once your wig is dry, gently brush through it with a wide-tooth comb or a paddle brush to remove any tangles. This creates a smooth canvas to work with. Secure the wig onto a mannequin head using T-pins through the ear tabs to ensure it doesn’t shift while you work. For intricate styles like updos, having a stable base is non-negotiable. It allows you to use both hands and see the style from all angles, ensuring symmetry and balance. This simple setup is what allows you to work with precision and control, just like a professional stylist.
Creative Styling Techniques
With your wig prepped and ready, it’s time for the fun part. The beauty of a high-quality human hair wig is its incredible versatility. You aren’t limited to just one look; you have the freedom to experiment with elegant updos, chic braids, and so much more. These creative styling techniques allow you to adapt your hair for any occasion, whether it’s a casual day out or a formal event. Learning how to create texture and hold is the key to making these more advanced styles last.
Creating Texture and Lasting Hold
For styles that need extra structure, like a voluminous ponytail or a formal updo, creating texture is key. You can build volume at the crown by gently teasing the hair at the roots. Take a small section, hold it straight up, and use a comb to gently push hair down toward the base. To lock everything in place, use a combination of a strong-hold, wig-safe hairspray and a quick blast from your hairdryer on the cool setting. This technique sets the style without making it feel stiff, giving you a look with impressive hold that lasts all day.
Popular Hairstyles for Human Hair Wigs
The styling possibilities with human hair wigs are nearly endless. You can create beautiful, intricate looks like a French braid, a classic chignon, or a trendy half-up style. The key is to work in small, clean sections. For an elegant updo, try curling the hair first to add texture and make it easier to pin. The right curling iron barrel size makes all the difference; a smaller barrel creates tighter waves perfect for a textured bun, while a larger one gives you soft, romantic curls that can be swept to the side.
Customizing Your Wig's Color and Thickness
If you want to make your wig feel even more like your own, you can explore more permanent customizations like changing its color or adding volume. These alterations go beyond daily styling and can fundamentally change the look of your wig to perfectly match your vision. While these techniques require a bit more commitment, they offer a level of personalization that can make your wig truly one-of-a-kind. For these types of changes, it's often best to seek professional help to protect your investment.
How to Dye a Human Hair Wig
You can color human hair wigs just like your own hair, but it’s a process that requires a delicate touch. Wig hair has been processed differently than the hair growing from your scalp, so it can absorb color much faster and more intensely. Because of this, we always recommend taking your wig to a professional colorist who has experience with wigs. They will know how to perform a strand test and use the right products to achieve your desired shade without compromising the integrity of the hair, ensuring a beautiful and even result.
Adding Hair for Extra Volume
To give your wig a fuller look, adding volume is an easy fix. For a temporary lift, gently teasing the hair at the roots is a fantastic technique. However, if you’re looking for a more permanent solution for added thickness, you can have a professional stylist sew in additional hair wefts. This is a great way to customize the density of your wig, adding body exactly where you want it. During a private consultation, we can discuss options for achieving the perfect amount of fullness for your face shape and desired style.
Keeping Your Styled Wig Looking Fresh
Once you’ve perfected your style, the next step is making it last. Proper maintenance is the secret to keeping your wig looking beautiful and extending its lifespan. Think of it as protecting your investment. A little care after each wear goes a long way in preserving the hair’s texture, shape, and shine, and it makes your next styling session much easier. By following a few simple routines for storage and upkeep, you can ensure your wig remains a source of confidence and comfort day after day.
Storing Your Wig to Preserve its Style
How you store your wig is just as important as how you style it. After taking it off, always handle it by the ear tabs to avoid putting stress on the delicate cap and hair fibers. The best way to preserve its shape is to place it on a wig stand or mannequin head. This allows air to circulate through the cap and helps the style hold its form. If you don't have a stand, you can gently place it back in its original box, but make sure it's completely dry first. Keep your wig away from direct sunlight, heat, and dust to prevent the color from fading and the fibers from getting damaged.
Time for a Refresh? When and How to Restyle
It might sound surprising, but styling your wig regularly is actually good for it. Consistent care prevents the hair from becoming dry, tangled, and dirty, which can lead to shedding. This doesn't mean you need to do a full heat-style every day. Simply brushing it out after each wear with a wide-tooth comb or paddle brush will keep it smooth. When you do decide it’s time for a full restyle, always start with a clean, dry, and detangled wig. Our collection of human hair medical wigs offers incredible versatility, allowing you to change your look as often as you like with the proper care.
How to Make Your Wig Last Longer
To get the most out of your wig, always use products specifically designed for wig care. Shampoos, conditioners, and styling sprays made for your wig type will protect the fibers and keep them looking their best. Be especially mindful of heat. While human hair wigs can handle heat styling, always use a heat protectant and the lowest effective temperature. Most synthetic wigs cannot tolerate heat at all, as it can melt the fibers. For personalized advice on caring for your specific wig, consider booking a consultation with one of our specialists. We can guide you on the best products and techniques for your needs.
Limiting Heat Styling Frequency
While it’s fun to switch up your look, it’s also wise to give your wig a break from heat. Even the highest quality human hair wigs can become dry or damaged over time with constant heat application. Think of it as a long-term care strategy. Before any heat touches the hair, always apply a heat protectant spray to create a protective barrier. When you do use your tools, opt for a lower temperature setting. It’s much gentler on the hair to do a second pass with your flat iron on low heat than to use a scorching hot temperature just once. By limiting how often you use heat, you help preserve the hair’s natural softness and shine, ensuring your wig stays beautiful for as long as possible.
Related Articles
- Human Hair Wig 101: A Complete Buyer's Guide
- 5 Safe Ways to Wash a Wig Without Wig Shampoo
- Natural Hair Wigs 101: A Complete Buyer's Guide
- How to Care for a Human Hair Medical Wig: A Guide
Frequently Asked Questions
How often should I wash my wig if I'm styling it regularly? A good rule of thumb is to wash your wig after every 7 to 10 wears. However, this can change depending on how many styling products you use. If you use hairspray or serums daily, you may want to wash it more frequently to prevent product buildup. The goal is to keep the hair clean and manageable, which makes styling much easier and helps preserve the hair's health.
Can I really use my regular flat iron or curling wand on a human hair wig? Yes, you absolutely can. The beauty of a human hair wig is that you can style it just like your own hair. The most important rules are to always apply a heat protectant spray first and to start with the lowest possible heat setting on your tool. Human hair wigs don't need extremely high temperatures to hold a style, so being gentle with the heat will give you beautiful results while protecting your investment.
What's the best way to make my wig look less like a wig? The secret to a natural look is in the small details. First, focus on the hairline. You can use a small brush to dab a bit of powder foundation along the part and hairline to help the lace blend seamlessly with your skin tone. Second, add some natural movement. Avoid making the style too perfect; a little bit of texture or a few face-framing pieces can make all the difference.
Is it better to style my wig on my head or on a mannequin stand? It really depends on the task. For anything involving heat styling, washing, or drying, a mannequin stand is your best option. It provides a stable base, gives you a 360-degree view, and keeps both of your hands free. However, for final touches like trimming bangs or checking how the layers frame your face, it's always best to put the wig on. This allows you to see the style in real-time and ensure it complements your features perfectly.
Why do I need to use special wig-safe styling products? Your natural hair produces oils that help break down the products you use, but a wig doesn't have that ability. Regular hairsprays and shampoos can create a sticky, dulling buildup on the hair fibers that is very difficult to wash out. Over time, this can damage the hair. Products made specifically for wigs are formulated to be gentle, rinse clean, and maintain the health and shine of the hair without causing buildup.
